光源と間接光
今までは、光やオブジェクト表面を物理原則に従い、設定してきました。この中では、物理原則とは異なるが、シーンをより効果的に本物らしく見せるテクニックを説明していきます。
光源の表現
POV-Rayのアルゴリズムでは、ライトは点光源になっていますが、これまでのようなライトの設定だけでは、白熱灯や蛍光灯のような輝く光源そのものを表現できません。
そこで、光源オブジェクトを設定する必要があります。以下のようにlight_source内に記述します。
light_source{
<座標値>
color<rの値,gの値,bの値>
looks_like{オブジェクト}
}looks_likeを記述することで光源オブジェクトの実体となる形と色として指定されたオブジェクトを利用できます。ライトの周りにオブジェクトを配置するとライトからの光の流れが妨げられますが、looks_likeで定めたオブジェクトは干渉しません。
光源オブジェクトを使用した例のコードと実行結果を以下に記しておきます。
#include "colors.inc"
#include "shapes.inc"
#include "textures.inc"

camera{
    location<5, 15, -40>
    look_at<0, 5, 0>
    angle 30
}


light_source{
    <0,5,0> color White
    looks_like{
        union{
            union{
                object{sphere{<0, 0, 0> 2}}
                object{cone{<0, -4, 0> 0 <0, -1, 0> sqrt(3)}}
                object{cylinder{<0, 0, 0> <0, -2.9, 0> 0.9 }}

                texture{finish{ambient 1} pigment{rgb <1, 1, 0.8>}}

            }
        object{cylinder{<0, -2.9, 0><0, -4.3, 0> 1.05}pigment{color White}}

        }
    }


}

object{

    Cube
    scale<10, 0, 5>
    translate<0, -0.4, 0>
    texture{Polished_Brass}
}

object{

    Plane_XY
    translate<0, 0, 7>
    pigment{brick color Tan color LightWood}

}
looks_likeで指定されたオブジェクトは、原点ではなく、点光源の位置に配置されます。また、looks_likeの内部で設定すると、光の流れに干渉しないので、通常のオブジェクトは外部で設定する必要があります。
間接光の表現
POV-Rayがレンダリングを行う際のアルゴリズムでは、オブジェクトに入射した光が反射して、そのオブジェクトの2次光源となって別のオブジェクトに光を伝える相互反射を上手く考慮できません。何らかの方法で、疑似的な間接光に光を加味することでバランスをコントロールできます。そこで、ambientを使います。前述したコード内で書いたようにオブジェクトに設定することで、間接光をコントロールします。
様々な照明
ここでは、実際に照明器具のあるシーンを組み立てていきます。
トンネル照明
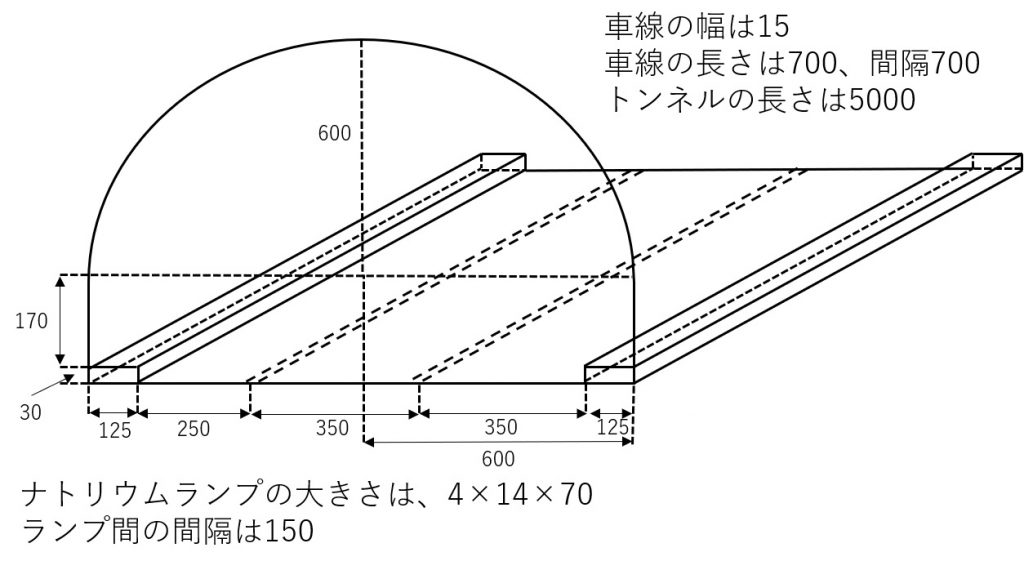
トンネル照明は、消費電力の低さや寿命の長さからオレンジ色のナトリウムランプがよく使用されます。ライトは実際のトンネルと同じように沢山配置しています。以下のように各値は設定しています。

#include "colors.inc"
#include "shapes.inc"
#include "textures.inc"

camera{
    location<0, 300, 0>
    look_at<0, 200, 500>
    angle 60
}


light_source{
    <0,700,10000> color White*5
}

background{color White}

//トンネルのオブジェクト
union{
    difference{
        object{box{<-1200, -100, 0><1200, 2000, 5000>}}
        object{box{<-600, 0, -1><600, 200, 5001>}}

        difference{
            object{cylinder{<0, 200, -1><0, 200, 5001> 600}}
            plane{<0, 1, 0>, 0}
        }
    }

    object{box{<600-125, 0, 0><600, 30, 5000>}}
    object{box{<-600+125, 0, 0><-600, -30, 5000>}}
    pigment{color rgb<0.2, 0.2, 0.2>}

}

//車線
union{
    object{box{<-15/2, 0, 0><15/2, 0.1, 5000>}
    translate x * (125-350)}
    #declare i = 0;
    #while(i * (700 + 700) < 5000)
        object{box{<-15/2, 0, 0><15/2, 0.1, 700>}
        translate<125, 0, (700 + 700) * i>}

    #declare i = i + 1;
    #end

    pigment{color White}
}

//ナトリウムランプ
#declare lump = rgb<1, 0.45, 0.05>;
#declare i = 0;
#while(i * (70 + 150) < 5000)
    light_source{
        <-(600-2) * cos(radians(20)),(600-2) * sin(radians(20)) + 200, i * (70 + 150) + 35>
        color lump * 0.02

        looks_like{

            object{
                box{<-2, -7, -35><2, 7, 35>}
                rotate z * -20
                pigment{lump}
                finish{ambient 1}
            }
        }
     }

     light_source{
        <(600-2) * cos(radians(20)),(600-2) * sin(radians(20)) + 200, i * (70 + 150) + 35>
        color lump * 0.02

        looks_like{

            object{
                box{<-2, -7, -35><2, 7, 35>}
                rotate z * -160
                pigment{lump}
                finish{ambient 1}
            }
        }
     }


#declare i = i + 1;
#end
繰り返しを用いれば、多くのライトを配置できます。この時に光源の強さを抑え、沢山ライトがあっても明るすぎないようにしています。また、日中を意識し、トンネル出口付近は明るくしています。
蛍光灯
蛍光灯は、円柱か円環の側面が均等に発光する線光源になります。POV-Rayでは、光源オブジェクトをlight_sourceのlooks_likeで記述しますが、蛍光灯のような線光源は点光源をいくつか配置する必要があります。この場合は、looks_likeを使わずに別途でオブジェクトを用意する方が簡単になります。
コード内では、光源オブジェクトにトーラスを用い、no_shadowと記述しています。これはライトからの光の流れを妨げないようにしています。また、点光源が増えてしまうので、ライトの強さを弱めています。
#include "colors.inc"
#include "shapes.inc"
#include "textures.inc"
#include "woods.inc"

#declare light_pos = 200;

camera{
    location<0, 180, -100>
    look_at<0, 180, 0>
    angle 70
}

//蛍光灯のライト
#declare i = 0;
#while(i < 36)
light_source{
    <10*cos(i*2*pi/36), light_pos+4, 10*sin(i*2*pi/36)>
    color White / 36
}
#declare i = i + 1;
#end

union{
    //光源
    object{
    torus{10,1}
    translate<0,4,0>
    pigment{color White}
    finish{ambient 1}
    no_shadow
    }

    //シェード
    union{
        difference{
            object{
                Sphere
                scale 20
            }

            object{
                Cube
                scale 20
                translate<0,-20,0>
            }

            object{
                Sphere
                scale 19
            }

            object{
                Cube
                scale 20
                translate<0,33,0>
            }

        }

        object{
            Disk_Y
            scale <14,0.1,14>
            translate<0,12.9,0>

        }

        pigment{color rgbt<0.55,0.09,0.09,0.3>*0.9}
    }

   translate y *light_pos
}
//シェード取り付け部分
union{
    object{
        Cone_Y
        scale 7
        translate<0,20,0>
        pigment{color Black}
    }

    object{
        Disk_Y
        scale <2,4,2>
        translate<0,27,0>
        pigment{color White}
    }
   translate<0, light_pos, 0>
}
//部屋
difference{
 object{
    box{<-361,-1,-361><361,301,361>}
 }
 object{
    box{<-360,0,-360><360,300,360>}
 }
 pigment{color rgb<1,1,0.70>}
}
結果を見ると、オブジェクトの影が柔らかくなっているのがわかると思います。このように、点光源を分散して配置すると自然なシーンを作れると言えます。