リアルな質感を再現する
質の高いイメージの模様を付けるのは大変です。そこで、POV-Rayでは、使用頻度の高い石や金属などのリアルな質感を再現する方法が用意されています。
質感の設定
オブジェクトの質感を表現するには、stones.inc、woods.inc、metals.incのような物体の材質が定義されたインクルードファイルを用い、texture命令で指定します。
石の質感
stones.incを使って石の質感を表現してみましょう。#include”stones.inc”を記述し、texture命令でT_Stoneを指定します。石の名前にはT_Stone1~T_Stone44まで指定でき、数字を変えると模様と色合いが変わります。
以下が実行結果になります。
#include "colors.inc"
#include "shapes.inc"
#include "stones.inc"


camera{
    location<2, 3, -5>
    look_at<0, 0, 0>
    angle 60
}

light_source{
    <0, 10, -10>
    color rgb<1,1,1>

}


object{
    Cube
    texture{T_Stone10}
}

background{color White}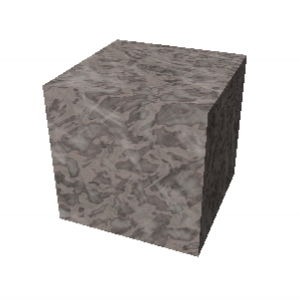
木の質感
木の質感は#include”woods.inc”を読み込んで、textureで木の名前を指定します。木の名前は、T_Wood1~T_Wood35が使用できます。
以下が実行結果になります。
#include "colors.inc"
#include "shapes.inc"
#include "woods.inc"


camera{
    location<2, 3, -5>
    look_at<0, 0, 0>
    angle 60
}

light_source{
    <0, 10, -10>
    color rgb<1,1,1>

}


object{
    Cube
    texture{T_Wood20}
}

background{color White}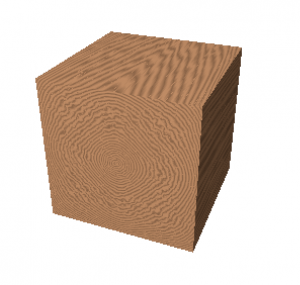
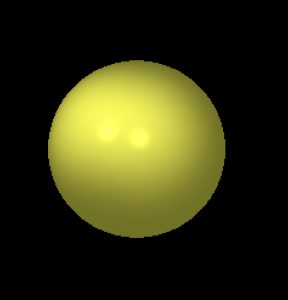
金属の質感
金属の質感は、finish命令での反射率などのパラメータを指定しても表現できますが、普通は#include”metals.inc”を読み込んでtexture命令で指定します。金属名はT_Gold_4Cのように数字は色合い、アルファベットは光沢の度合いを表します。種類は、Gold(金)、Silver(銀)、Copper(銅)、Brass(真鍮)、Chrome(クロム)などがあります。
以下が実行結果になります。
#include "colors.inc"
#include "shapes.inc"
#include "metals.inc"


camera{
    location<2, 3, -5>
    look_at<0, 0, 0>
    angle 60
}

light_source{
    <5, 10, -10>
    color White

}

light_source{
    <-5, 10, -10>
    color White

}


object{
    Sphere
    texture{T_Gold_1C}
} 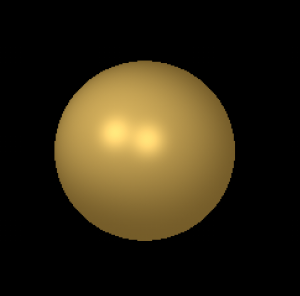
上のコードでは、metals.incを使いましたが、texture.incでは金属の質感が変わってきます。その場合はこのような質感になります。
金属表面の映り込みを表現する
通常、金属の表面にはまわりの物体や風景が映り込みます。地面や空を設定すると、よりリアルになります。コードと実行結果は以下のようになります。
#include "colors.inc"
#include "shapes.inc"
#include "textures.inc"
#include "skies.inc"


camera{
    location<2, 3, -5>
    look_at<0, 1, 0>
    angle 60
}

light_source{
    <5, 10, -10>
    color White

}

light_source{
    <-5, 10, -10>
    color White

}

object{
    Sphere
    translate<0,1,0>
    texture{Aluminum}
}

object{
    Plane_XZ
    pigment{brick color Gray, color Brown}
}

sky_sphere{S_Cloud4} 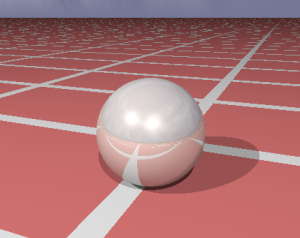
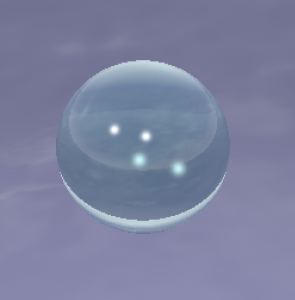
ガラスの質感
texture.incであらかじめ定義されたガラスの設定を使えますが、他と同様に#include”glass.inc”を読み込んで、さらに細かいガラスの設定を使用することができます。
pigment{color Clear}で、オブジェクトを透明にします。その後、finishでガラス表面の性質を指定します。F_Glass1~F_Glass10が使用できます。interiorでは、I_Glassでオブジェクト内部の性質を決められ、8種類あります。fade_colorでのカラーの指定は96種から設定できます。iorは屈折率で、1.0の場合はなしになります。
#include "colors.inc"
#include "shapes.inc"
#include "glass.inc"
#include "skies.inc"


camera{
    location<2, 3, -5>
    look_at<0, 0, 0>
    angle 60
}

light_source{
    <5, 10, -10>
    color White

}

light_source{
    <-5, 10, -10>
    color White

}


object{
    Sphere
    pigment{color Clear}
    finish{F_Glass1} //ガラス表面の性質
    interior{
        I_Glass1 //ガラス内部の性質
        fade_color Col_Emerald_03 //ガラスの色
        ior 1.33 //屈折率

    }
}

sky_sphere{S_Cloud1}